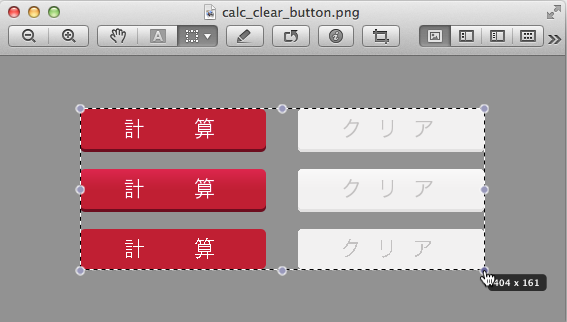
![]() WEBページでボタンを作る際に、(1)通常の画像、(2)マウスオーバーした時の画像、(3)クリックした時の画像と3種類の画像を使うのだけれど、これを1つの画像ファイルにまとめておきたいという時の話です。ボタン以外にも似たような画像を1つのファイルにまとめておきたい時も同じようにできます。
WEBページでボタンを作る際に、(1)通常の画像、(2)マウスオーバーした時の画像、(3)クリックした時の画像と3種類の画像を使うのだけれど、これを1つの画像ファイルにまとめておきたいという時の話です。ボタン以外にも似たような画像を1つのファイルにまとめておきたい時も同じようにできます。
画像ファイル
元の画像は3種類の状態をもつ2つのボタンをこんな感じに1つのファイルにまとめています。

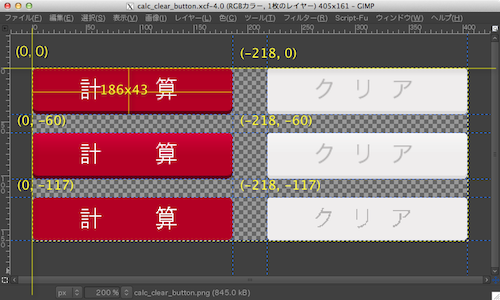
使う前に画像の位置とサイズを確認しておきます。画像編集アプリには大抵ガイドとルーラーがあるので部分画像の左上の座標を調べます。

原点が左上です。
これをもとにcssを記述します。
■背景画像の部分指定
background: url(画像ファイル) no-repeat left top;
最終的なCSSはこんなかんじです。
#btn_convert {
 display:block;
 width: 186px;
 height: 43px;
 padding: 0;
 border: 0;
 background: url(https://kisagai.com/gmc_api/lib/image/calc_clear_button.png) no-repeat left top;
 text-indent: -9898px;
 font-size: 0px;
 line-height: 0x;
 cursor: pointer;
}
#btn_convert:hover,
#btn_convert:focus {
 background-position:left -60px;
}
#btn_convert:active {
 background-position:left -117px;
}
#btn_clear {
 display:block;
 width: 186px;
 height: 43px;
 padding: 0;
 border: 0;
 background: url(https://kisagai.com/gmc_api/lib/image/calc_clear_button.png) no-repeat -218px top;
 text-indent: -9898px;
 font-size: 0px;
 line-height: 0x;
 cursor: pointer;
}
#btn_clear:hover,
#btn_clear:focus {
 background-position:-218px -60px;
}
#btn_clear:active {
 background-position:-218px -117px;
}
ちなみに、ボタンのhtmlはinputタグにidを指定しています。
出来上がったページはこれです。